Introduction
Printing is still in any business environment, and it will continue for long years, we still need paper for our important document, such as alerts, invoices, orders,
reports. Automating the printing of incoming emails saves significant time and effort,
particularly for secretary, alert services, e-commerce and many other businesses that rely heavily on email communications. This guide will
walk you through setting up automatic email printing using Automatic Email Manager, Microsoft Outlook, Thunderbird and Gmail.
Table of contents
How to automatically print filtered emails and attachments in real-time?
Many solutions are available to auto-print emails and attachments, but few offer full automation and control over the printing process.
We will start with the most useful solution: Automatic Email Manager.
Automatic Email Manager is the only solution that enables printing emails from any mailbox without needing additional software like
Outlook or Thunderbird. It can connect to Office365, Gmail, Exchange, Yahoo, IMAP4, and POP3, and process your emails with attachments.
Many functions are available, such as printing, converting emails to PDF, EML, MSG, TXT, and XML. You can also send emails to your
Team channel, Telegram, or Slack. I will let you discover all the useful functions in Automatic Email Manager here »
Instructions for using Automatic Email Manager to print emails:
Step 1.
If you haven't installed the 30-day trial version of Automatic Email Manager on your Windows computer or server, I suggest you do so. You don't need to register or provide any information like an email address.
Step 2.
Add the connection to your email inbox (you can add multiple inboxes). It is very easy with the wizard.
TIP: View a short video to discover the keys concept »

Step 3.
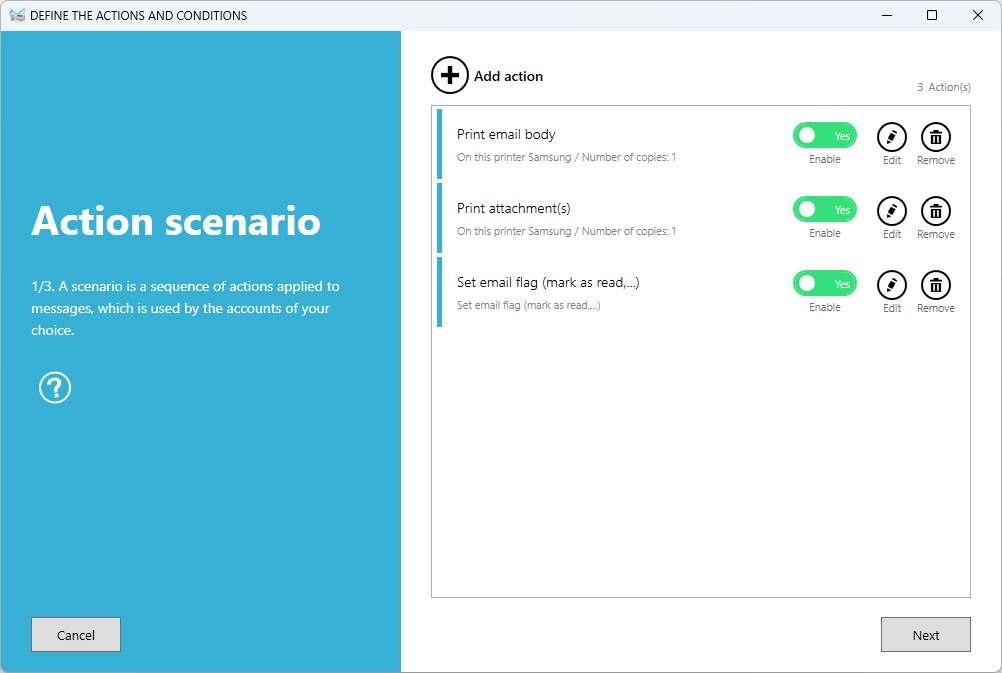
Create a new scenario, or use the default one, to print the emails and/or attachments. You can print on multiple printers at the same time and have full control over printer settings.
TIP: I suggest you to add 2 more actions to mark the email as read and move the email from inbox to another folder to keep your inbox clean with processed emails.
Step 4.
Optionnally, you can add a condition with rules if you want to process only specific emails based on email address, subject, content, ...

Step 5.
That’s all. Automatic Email Manager runs in the background and prints your incoming emails automatically, even if you are logged out, as long as the Windows service is running.
View a short video explaining how to print automatically your emails »

- Supports multiple different printers using rules
- Running 24/7 on your Windows pc or Windows server
- Don’t need to be logged
- Don’t need Outlook, Thunderbird or any additional software
- Compatible with any email service: O365, Exchange, Gmail, Yahoo, Apple Mail, IMAP, POP
- Security: processes your email's data locally on the computer where it is installed
- The best solution to print all incoming emails effortlessly and boost productivity
- Not free after 30-days trial
- Only for Windows desktop or Windows server (No MacOs or Android version)
- It is a new software to install
Alternative solution with Outlook for desktop:
You can also use Outlook for desktop to
set up a rule to print emails. However, this is only possible if you have Microsoft Outlook for desktop installed on your computer (the web version can’t do this), and you must be logged into Windows with the application running (installing it on a Windows server won't work). Additionally, you can’t choose which printer to use; it will always use the default printer, which isn't the simplest solution. Here are the steps if you want to try:
Anyway, here the steps if you want to try:
Step 1
Open Outlook, go in the tab Home, click on ‘Rules’, then click on ‘Create Rule’, and finally click on ‘Advanced Options’.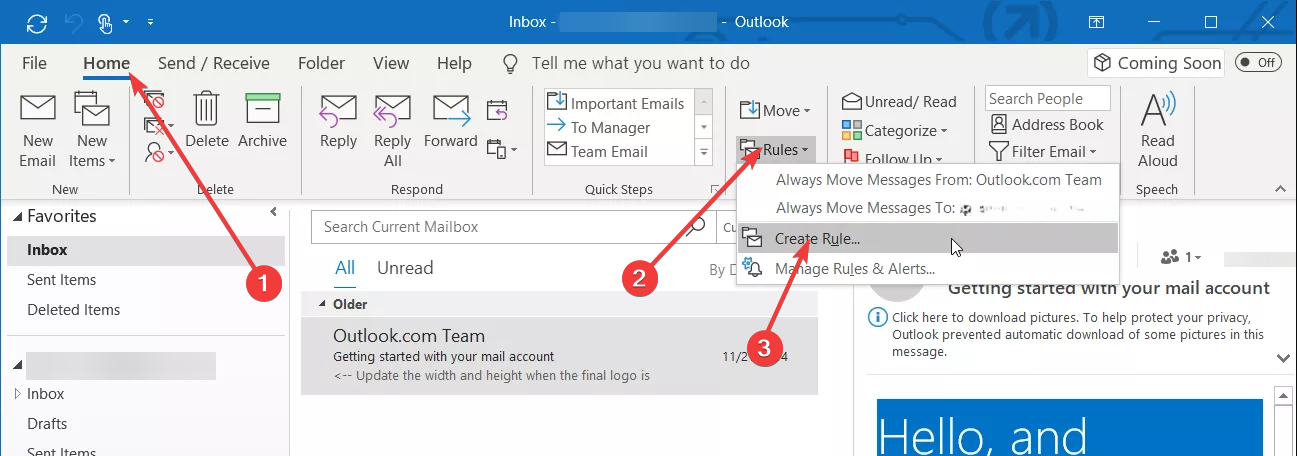
Step 2
Follow the instructions on the Rules Wizard screen. Select the conditions to filter the emails, then click next and set the action to 'Print'. Keep in mind that you can’t choose a specific printer; it will use the Windows default one.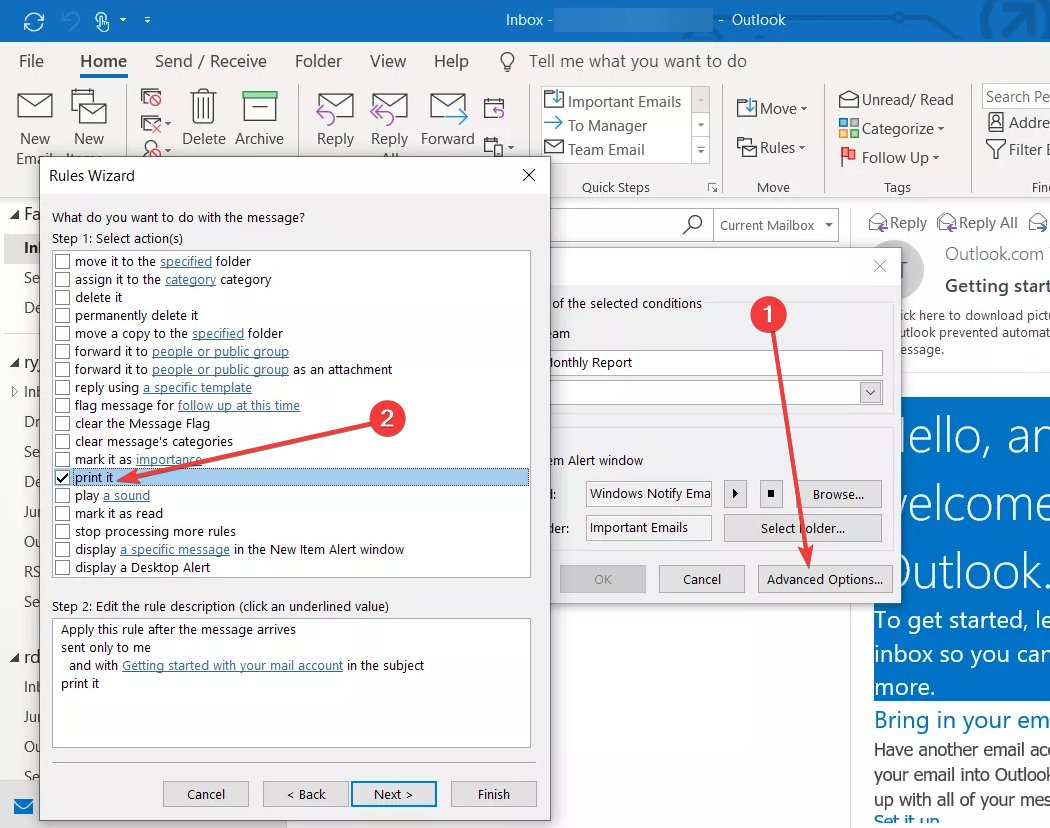
Step 3
You're done setting up to auto-print emails from Outlook desktop. Now, every incoming email that matches the rule you set will automatically print to the default printer.- No additional software to install
- Simple settings
- Works with any email box: Native O365, Exchange, Gmail, Yahoo, Apple mail, IMAP, POP
- You can’t choose your printer (use the Windows default printer), .
- Can work only with desktop version of Outlook
- You must be logged to Windows
- Outlook desktop must be running
Alternative solution with Mozilla Thunderbird
Thunderbird is a free desktop alternative to Microsoft Outlook for reading, replying, and managing emails. It has many built-in features,
but not for our current need: printing emails automatically. For this, you'll need to use an add-on called FiltaQuilla (read more on this addon here »)
Step 1
Install FiltaQuilla add-ons to Thunderbird, link here ».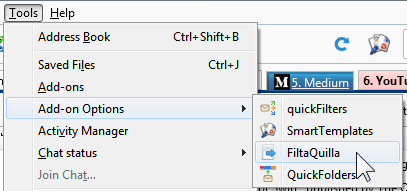
Step 2
Set the printer preferences in FiltaQuilla when a new email is detected.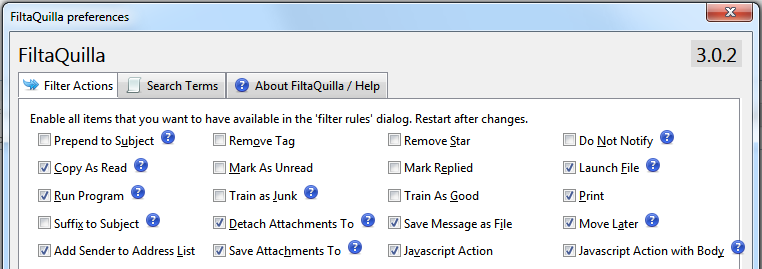
Step 3
Create a filter that automatically applies the Print Action to messages that satisfy certain criteria.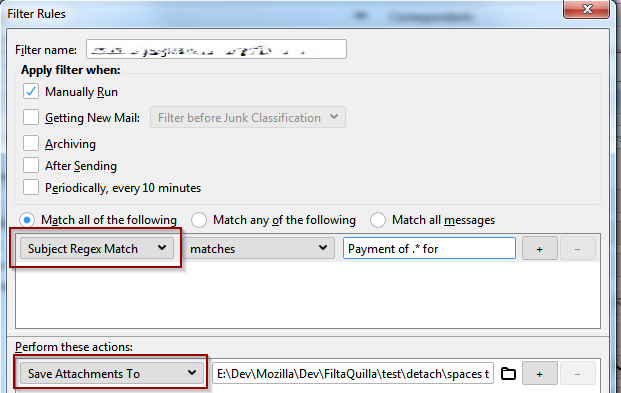
Step 4
Normally it should print your emails automatically when Thunderbird is opened within your Windows session.- If you are a Fan of Thunderbird!
- Works with classic email box: Gmail, Yahoo, Apple mail, IMAP, POP
- You need to install an external Addon
- The addon is complex to setup
- You must be logged to Windows
- Thunderbird must be opened
- Can't connect to native O365 and Exchange
Alternative solution for Gmail:
Unfortunately, there is no automatic way to print emails directly from Gmail since it is a web-based email service. You can only print emails
manually from the browser, one at a time.
However, there are a few alternatives. You can use a solution like Automatic Email Manager, which is reliable and effective. Another option is to
use desktop email software like Outlook (see the instructions above) that can connect to Gmail.
Anyway here the steps to print manually your Gmail message from the browser:
Step 1
Open Gmail: Go to your Gmail account using a web browser.
Step 2
Select the Email: Open the specific email you want to print.Step 3
Click 'More': In the top-right corner of the email, click on 'More'Step 4
Choose 'Print': Select the 'Print' option.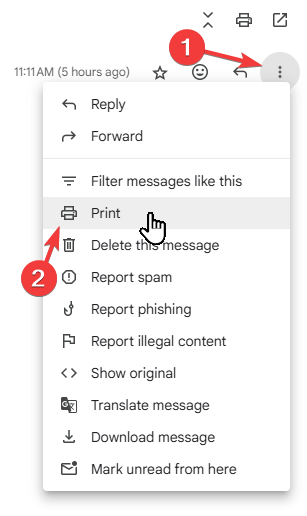
Step 5
By following these steps, you can manually print any email from your Gmail account. Remember, for frequent printing tasks, consider using specialized software to streamline the processA brief summary for the best choice
There are various methods available for printing emails, but automatically printing them is not a common feature. The existing solutions tend
to be either too simplistic, such as Outlook's limitation to the default printer, or too complicated to set up, like Thunderbird +
FiltaQuilla.
Using online platforms like Zapier or IFTTT is limited to web-based processes and cannot access local devices such as printers. Our
recommendation, therefore, is to utilize Automatic Email Manager. This software has been trusted since 2006 and has
sold over 30,000 licenses. It is simple to use, backed by excellent support, and benefits from regular updates to ensure
continued development.


